Installing on Windows with WSL2
This guide has been tested on Windows 10 (22H2) and Windows 11.
Install Windows Subsystem for Linux (WSL).
Remember to run Powershell in Administrator mode either by right clicking and selecting Run as administrator or by typing PowerShell in Run dialog box of Windows and pressing Ctrl+Shift+Enter key combination.
Install Ubuntu distribution of Linux with one of these options:
wsl --install --distribution Ubuntu- Follow the WSL installation guide
- How to install WSL in Windows 11
- Manual installation steps for WSL
Once WSL is installed, make sure to:
- Set up your Linux username and password
- Update and upgrade packages
- Verify the Ubuntu distribution with the command:
lsb_release -a - You can verify your WSL/Ubuntu installation by executing this command in PowerShell:
wsl -l -v
Install Docker Desktop
Install docker desktop with the WSL 2 backend. You can find the instructions here.
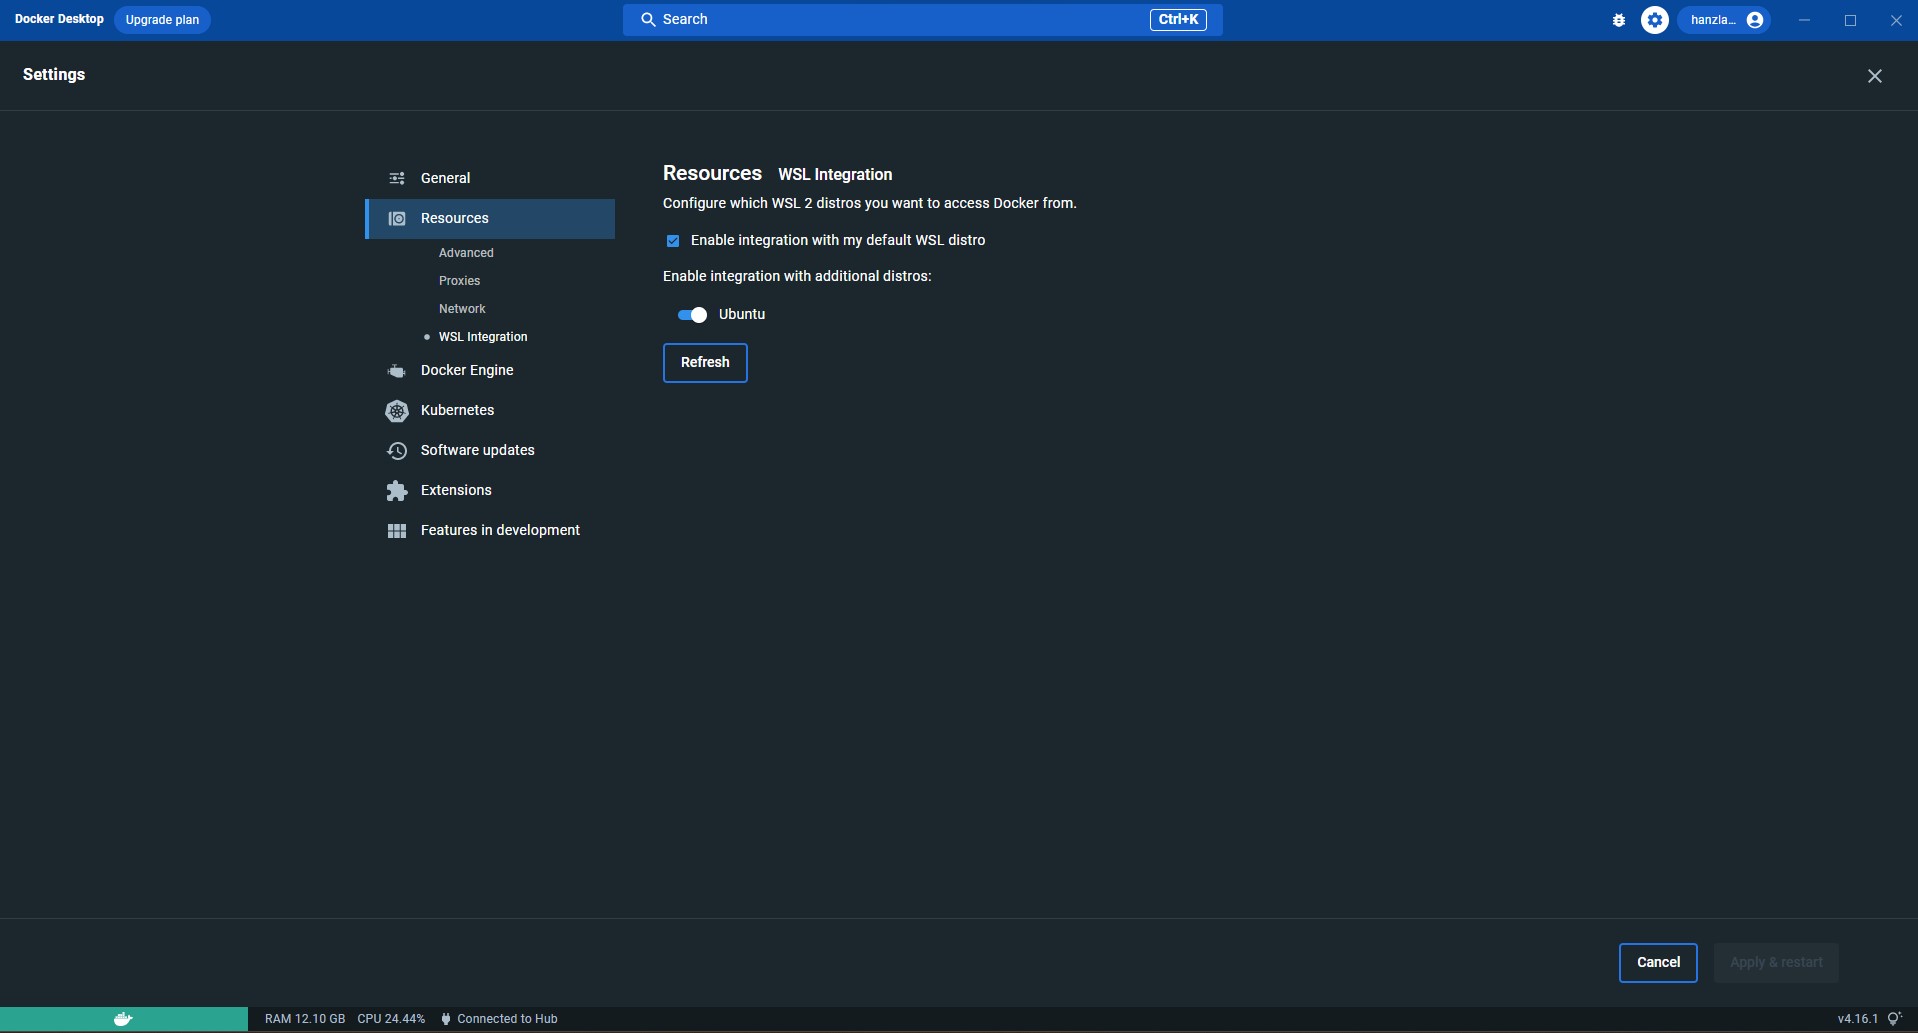
Make sure to enable your WSL distribution once docker desktop is installed and running.
You can do so from Docker Desktop App by visiting Settings > Resources > WSL Integration.
Enable integration with Ubuntu, and make sure to hit Apply & Restart.
Install Node
If Node is not already installed on your machine (check with node --version), you can do so by first installing nvm and then installing Node with nvm.
Important:
Make sure that the commands in this section are run inside Ubuntu WSL.
To ensure that this is the case, there are two options:
- Launch WSL manually:
- Run Powershell in Administrator mode and run Ubuntu using the command:
wsl.- After logging in to Ubuntu, run the command:
cd ~/- Open your application menu and search for
Ubuntu Terminal
To install nvm, run the following commands in your WSL Ubuntu terminal:
curl https://raw.githubusercontent.com/creationix/nvm/master/install.sh | bash
source ~/.profile

export NVM_DIR="$HOME/.nvm"
[ -s "$NVM_DIR/nvm.sh" ] && \. "$NVM_DIR/nvm.sh"                   # This loads nvm
[ -s "$NVM_DIR/bash_completion" ] && \. "$NVM_DIR/bash_completion" # This loads nvm bash_completion
Verify that nvm was installed correctly by using the command: nvm --version.
Afterwards, install Node (version between 16.0 and 18.0 both inclusive) with:
nvm install 18
You can verify your Node version with the command: node --version.
Install Python 3
If Python 3 (pip3 --version) is not already installed on your device, you can do so by running following commands from your Ubuntu terminal:
sudo apt-get update -y
sudo apt-get install -y python3-pip
You can verify that Python3 is installed correctly with the command: python3 --version.
Install Make
If Make (make --version) is not already installed on your device, you can do so by running following commands from your Ubuntu terminal:
sudo apt-get update -y
sudo apt-get install -y build-essential
You can verify that Make is installed correctly with the command: make --version
Clone Ethereal Engine repo to your local machine
Clone Ethereal Engine repo on your machine by running the following command from your WSL Ubuntu terminal:
git clone https://github.com/etherealengine/etherealengine --depth 1
Warning:
Adding--depth=1will significantly reduce the amount of data downloaded when cloning, but it will also create aShallow Copyof the engine's repository.
If you need to download any branch other thandev, or go back in git history into an older commit, you will have to unshallow the repository first, or else any branches and older commits won't be accessible. The command to undo cloning with--depth=Nis eithergit fetch --unshalloworgit pull --unshallow
Change directory to the location where etherealengine repository is cloned with:
pwd                 # Prints the current working directory
cd etherealengine   # Change directory to `etherealengine`
If an .env.local file does not exist in the root of your Ethereal Engine repository folder, then create it by duplicating the .env.local.default file:
cp .env.local.default .env.local
Afterwards, install npm packages with:
npm install
Note: If you find issues related to
mediasoupwhen runningnpm install, then:
- Remove the
mediasouppackage frompackages/instanceserver/package.jsonfile of Ethereal Engine's source code.- Run
npm installagain.- Run:
npm install mediasoup@3 -w @etherealengine/instanceserver
Initialize MariaDB server
You will need to initialize the engine's database with tables and data if you are running the engine for the first time. You can do so with:
npm run dev-reinit
Start the Engine
Run the Ethereal Engine's stack with:
npm run dev
If everything went well, you will now be able to open Ethereal Engine in your browser by navigating to this link.
Accept Certificates
When loading the engine's website for the first time you'll have to tell your browser to ignore insecure connections.
- Open the
Developer Toolsof your browser by clicking the side menu with three dots, then go toMore tools > Developer tools(or use eitherCtrl+Shift+IorF12) and then go to theConsoletab. - You will see some errors in URL addresses starting with
wss- Replace
wsswithhttpsand open that URL in a new tab - Accept the certificate
- Reload your Ethereal Engine's tab
- Replace
- You will see some errors in URL addresses starting with
https://localhost:9000- Open the URL linked in one of those errors
- Accept the certificate
- Reload your Ethereal Engine's tab
You need to do this for the following domains:
wss://api-local.etherealengine.org-> https://api-local.etherealengine.orgwss://instanceserver-local.etherealengine.org-> https://instanceserver-local.etherealengine.org- https://localhost:9000
If the engine's website keeps displaying
loading routesprogress for a long time, it means that you have to allow the engine's certificates.
Web browsers will throw warnings when navigating to pages with unknown certificates (aka: insecure pages). You should be able to tell the browser to ignore these warnings by opening your browser's advanced options, but during development it is easier to just ignore the browser's warnings and accept the default certificates.
Note: You will be able to create signed certificates to replace the default ones when you deploy your own Ethereal Engine stack.